
Installing The Apex Semi Drop-In Barrel
Below are step-by-step instructions for installing the Apex Grade Semi Drop-In Barrel. (You can download a PDF version HERE.) Due to the wide variations in tolerances with the M&P pistol, the barrel may in some cases fit without any additional fitting. However, it is likely that some minor fitting will be required, which is easily accomplished using the proper tools and following these instructions. If after reading these instructions and watching the installation video you still have questions, please contact Apex Customer Service at (805) 528-5250.

WARNING!
Before you start fitting the Apex Grade Semi Drop-In Barrel, be aware that once you begin removing material the barrel is no longer returnable. When fitting the hood width, length and fitting tab, please go slowly. Once metal is removed it cannot be put back. Do NOT use a Dremel or similar tool.Recommended Tools
- Narrow Pillar File (available from Brownell’s part # 191-400-760WB)
- Bench Vise with Smooth or Padded Non-Marring Jaws
- Dykem Hi-Spot Blue
 Fitting Procedure

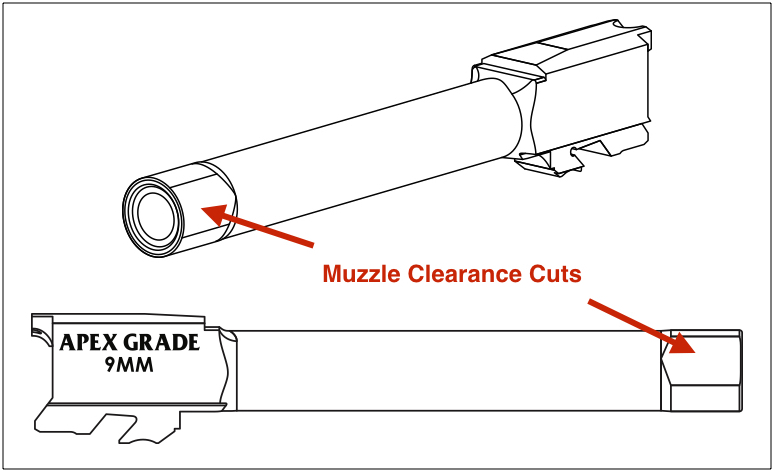
- Check to see if the muzzle end of barrel will fit into slide. Due to the generous dimensional tolerances of the slides, the bell of the muzzle is set to maximum dimension with clearance cuts on the left and right of top dead center. In some cases, material may need to be removed to allow barrel insertion. If you do not feel comfortable with this operation, contact us to make arrangements for Apex to perform this service.
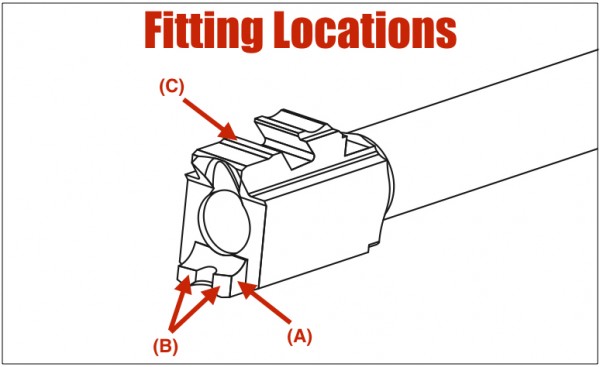
- Check to confirm proper side clearance of barrel hood extension to breech cutout. Our barrels are cut for proper clearance, but due to manufacturing tolerances of the slide, it may be necessary to evenly remove material from the left and right side (position A) of the barrel hood extension. Note: Fitting of position A is for clearance and does not impact accuracy.
- Check hood length. If the barrel does not drop in smoothly, use the Narrow Pillar File to evenly remove material from the barrel hood extension (position B). It should only take a few strokes of the file to get a precise fit with no fore or aft movement of the barrel when fully seated in the slide.
- Coat the barrel's lower lug fitting pad (position C) with Dykem Hi-Spot Blue. Assemble the barrel, slide and recoil spring assembly, then install on the frame. Allow the slide to go forward to verify that the slide assembly will go into full battery. If it does not, remove the barrel from the slide and inspect the fitting pad for removal of the Dykem. Using the Narrow Pillar File, evenly remove material from the fitting pad. Repeat this process until the slide assembly (with recoil spring installed) goes into battery with no more than 2 lbs of thumb pressure on the back of the slide (with recoil spring installed). Note: The Apex Grade Barrels were designed to work with the factory recoil spring assembly. Use of reduced power recoil springs and/or compensators can result in improper function.
General Notes
- When fitting the hood width, length and fitting tab, go slowly. Once metal is removed it cannot be put back.
- The Apex Grade Barrels were designed to work with the factory recoil spring assembly. Use of reduced power recoil springs and/or compensators can result in improper function.
Thank you in advance.
What is the turn around time if I were to send in my slide and order the barrel for Apex to custom fit?